Posts

Showing posts from September, 2009

Quad Core Laptop - TOSHIBA QOSMIO X305-Q725

Image
SPECIFICATION OF TOSHIBA QOSMIO X305-Q725 notebook . This is the best notebook hardware . This is gaming notebook . Intel Core 2 Quad Processor Q9000 (2.0GHz, 1066MHz, 6MB Cache) 4GB DDR3 memory PC3-8500 DDR3 Windows Vista Ultimate (64-bit, SP1) NVIDIA GeForce 9800M GTX graphics (1GB GDDR3) 17” WSXGA+ Display 1680x1050 (Glossy) Intel Mobile PM45 Chipset DVDRW-SuperMulti with Labelflash 64GB SSD + 320GB hard drive (7200rpm) Intel 5100AGN WiFi and Bluetooth 2.1 + EDR Stereo speakers with subwoofer Webcam and microphone 180W (19V x 9.5A) Power Supply Battery:8-cell 14.4V 58Wh Weight: 9lbs 5oz Size: 16.2” x12.0” x 1.7” /2.5” with feet Price about $2,699.99 (4) harman/kardon® Stereo Speakers with Sub-Woofer Not two but four high-fidelity stereo speakers—and one very powerful sub-woofer—envelop you in sound and put you right in the middle of the action. Get rocked by explosions. Shrink from shattering glass. And feel stirring soundtracks swirl all around you. harman/kardon® Stereo Speaker

System Requirements for Grand Theft Auto 4 (GTA IV)

Image
This is info for gamers . This is Grand Theft Auto 4 (GTA IV) System Requirements . Your PC should powerfull to play this PC Game Minimum System Requirements - OS: Windows Vista - Service Pack 1 / XP - Service Pack 3 - Processor: Intel Core 2 Duo 1.8Ghz, AMD Athlon X2 64 2.4Ghz - Memory: 1.5GB, 16GB Free Hard Drive Space -Video Card: 256MB NVIDIA 7900 / 256MB ATI X1900 Recommended System Requirements -OS: Windows Vista - Service Pack 1 / XP - Service Pack 3 -Processor: Intel Core 2 Quad 2.4Ghz, AMD Phenom X3 2.1Ghz -Memory: 2 GB (Windows XP) 2.5 GB ( Windows Vista ) -18 GB Free Hard Drive Space -Video Card: 512MB NVIDIA 8600 / 512MB ATI 3870 gta4.net

Create menu of Autorun CD by AutoRun Pro Enterprise

Image
AutoRun Pro Enterprise created by Longtion Software Inc. AutoRun Pro Enterprise can create, edit professional autorun interface and generate autorun files for CD/DVD. Display a professional and beautiful interface for users to open or execute files, print documents, send e-mail, visit Web sites, browse CD, play sound, music and so on, when your CD is inserted. It's fast and easy to use. Anyone can quickly create autorun CD-ROM within minutes. Features of AutoRun Pro Enterprise • No programming knowledge required. • Display of every registered document (e.g.: TXT, DOC, HTML) via automatic start of the corresponding application. • Print of every registered document (e.g.: TXT, DOC, HTML) via automatic start of the corresponding application. • Start any program. • Start the default browser with document URL. • Send email. • Integrated Web browser and internal commands. • Integrated sound player. • Integrated AVI video player. • Integrated RTF (Rich Text) viewer.

Create Visual Basic Form Interesting and Unique

Image
Are you boring of your Visual Basic Form appearance ? I have tried to change skin of Visual Basic Form. I use Active Skin software to change Visual Basic Form like above. 1. First you download Active Skin and get patch of this software and install it. 2. Open Microsoft Visual Basic 6 and create a form with a command button. 3. Add Active Skin component by press "Ctrl + T". On the Components window you click browse and find actskin4.ocx file in "C:\Windows\system32" and then open it. Click Apply on Components window and close that window. Active Skin component will be added onto Toolbox. Click skin and apply it on your form. 4. Click View Code on Project Explorer type code below or you can download this project . '------------------------- Option Explicit Private Declare Function GetOpenFileName Lib "comdlg32.dll" Alias "GetOpenFileNameA" (pOpenfilename As OpenFilename) As Long Private Type OpenFilename lStructSize As Long hwndOwner As Lo

Create Loading Process by Visual Basic 6

Image
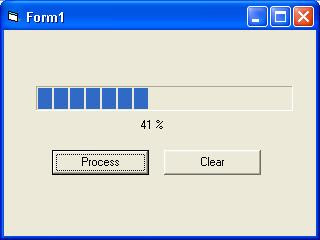
Do you know progressbar ?. Progressbar is a component of Visual Basic that use for loading process. To create this project we need 4 components: a progressbar, a timer and two command buttons. In default condition, progressbar is not show on the toolbox. To show progressbar on the toolbox you must open component menu by click Project menu -> Components or you can also use shortcut key "Ctrl + T". Components windows appears on the screen. Now, you create a progressbar, a timer and two command buttons on the form. 1. Click Command1 and look on the Properties windows. Change command1 caption. Command1.Caption = "Process" 2. Command2.Caption = "Clear". Look at first step! 3. Click timer1 and look configuration of Properties - Timer1. Change interval to 10. Increase the value of interval will make loading process slower. Decrease the value of interval will make loading process faster. In the last, you type code below on the Code Windows by click the "V

Linux Fedora Core 7 Installation

Image
Fedora is a Linux -based operating system that showcases the latest in free and open source software . Fedora is always free for anyone to use, modify, and distribute. Tutorial - Step by step install Linux Fedora Core 7 : 1.) There are 4 options. You can select 1st option to install new linux operating system. Press ENTER. 2.) Linux will load installer. Please wait for few minutes. 3.) There are 2 options. Click OK if you wish to check the CD media berfore installation. Click Skip if you sure that your CD in good condition. Press arrow button to select an option and then press space. 4.) You will enter GUI (Graphical User Interface) setup. Click Next. 5.) Please select language for installation process. Click Next. 6.) Select the appropriate keyboard for the system. Click Next. 7.) WARNING will appears. Click Yes to confirm create new partition and erasing ALL DATA. 8.) Select method of partition creation. Click 2nd option to remove linux partition. Click Next. 9.) Click Yes to c

Run file from Visual Basic 6

Image
You can run all type of file from Visual Basic . 1. Create new project 2. Create a text box and a command button. 3. Double click the Command1 button and type code below. '====================================================== If Right(Text1, 3) = "exe" Or Right(Text1, 3) = "com" Then Shell (Text1) Else Dim x As String x = Text1.Text Set execute = CreateObject("Wscript.shell") execute.run x End If '======================================================= 4. Click Run file button so file can be run from this program Note: - You just type shell command for run *.exe file and *.com file - Error will occured if you run the file that contains "space character"

Type of data on Visual Basic 6

Integer = -32768 until 32767 Long = -2147483.648 until 2147483.647 Single = Positive: 1.401298E-45 until 3.402823E38 Negative: -3.402823E38 until -1.401298E-45 Double = Positive: 4.94065645841247E-324 until 1.79769313486232E308 Negative: -1.79769313486232E308 until -4.94065645841247E-324 Currency = -922337203685477.5808 until 922337203685477.5807 String = 0 until 2 billion characters (95/97 & NT) and 0 until 65535 characters (ver 3.1) Byte = 0 until 255 Boolean = True or False, 1 or 0 Date = January 01, 100 until December 31, 9999 Variant = Null, error, and other type of data like boolean, numeric, string.

Trick - Automatic Logon on Windows XP

Image
If you are lazy to enter a password every time you log on to Windows XP then you can try this trick that can make you able to log on automatically in Windows XP . How to automatically logon in Windows XP : 1. Open the Registry Editor by clicking Start Menu -> Run. Type "regedit" (mark the quotes) -> press ENTER or click OK, then will show the Registry Editor window. 2. Sign in to key: HKEY_LOCAL_MACHINE \ SOFTWARE \ Microsoft \ Windows NT \ CurrentVersion \ Winlogon. 3. Right-click on the key "Winlogon" and select New -> String Value. Give the name of "AutoAdminLogon" and insert the value data with the number "1". 4. Right-click on the key "Winlogon" and select New -> String Value. Give the name of "DefaultPassword" and insert the value data with your password. 5. Right-click on the key "Winlogon" and select New -> String Value. Give the name "DefaultUserName" and insert the value data with